


Mindspore-Powered Neural Search in Jina
I often use the analogy Tensorflow for search to describe what Jina is. Jina sits one layer above the universal deep learning framework; it provides the infrastructure for deep learning-powered search solutions. When it comes to the deep learning backend, Jina is pretty agnostic and inclusive. In this article, I will show you how to leverage Mindspore as the deep learning backend in Jina to build an image search solution.
MindSpore is a new opensource universal deep learning framework released in 2020. It delivers a smooth development experience and the efficient execution for data scientists and algorithmic engineers. One of the highlights for Mindspore is the native support of Ascend AI processor (a NPU with specialized circuit optimized for ML algorithms), enabling joint optimization on software and hardware.


In this article, you will learn:
- How to create an
EncodeExecutorusing Mindspore and Jina Hub API - How to (re)use the
MindsporeExecutorin the index and search flows
Some preliminaries you will need:
- Mac OS or Linux
- Python 3.7, 3.8
- Jina 0.7+ with Hub extenstion (i.e.
pip install "jina[hub]") - Docker
As of today, Mindspore does not have native support on Mac OS. While their development team is actively working on that, in this tutorial we don’t need Mindspore running natively. In fact, this tutorial and all the code are made on Mac OS. We will see how Jina leverages the containerization to enable Mindspore running on Mac OS and use it as a microservice.
The code of this article can be found in here.
Table of Contents
Shop-the-Look Problem
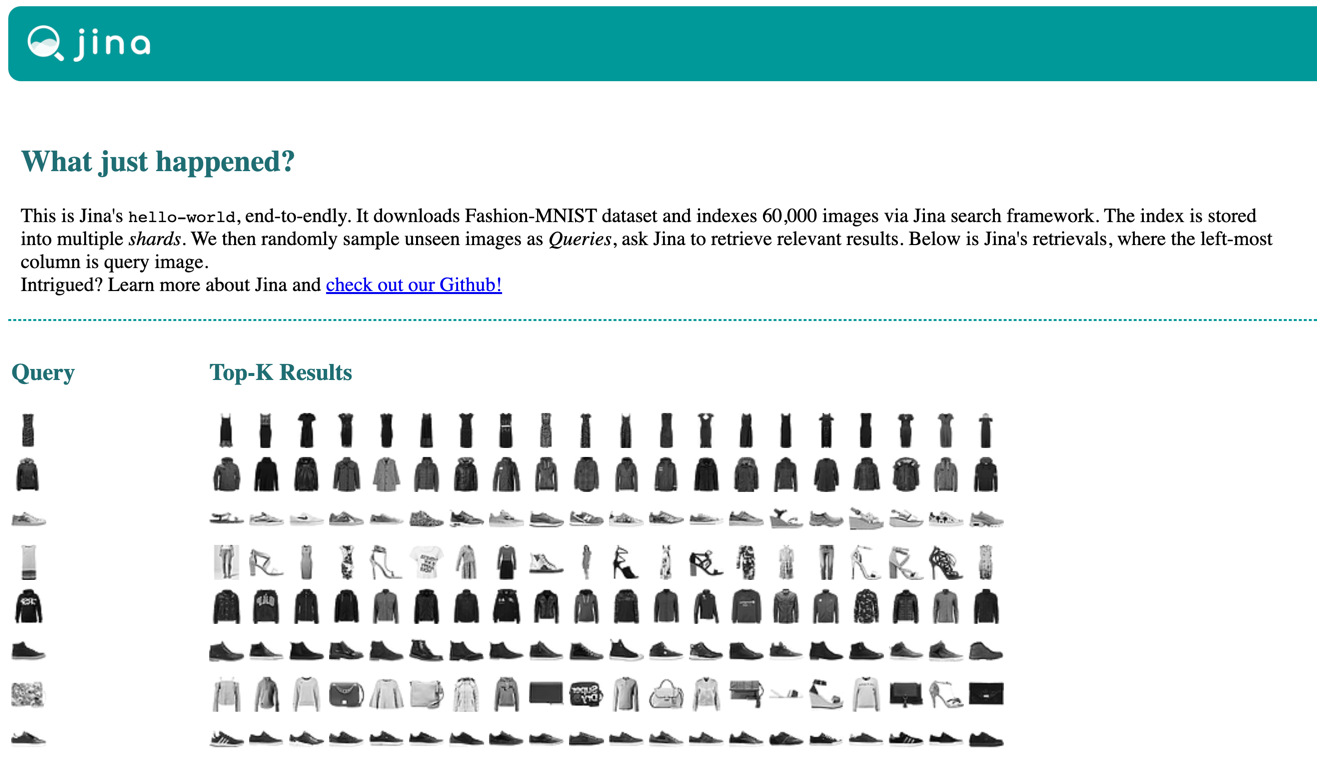
The problem we will work on today is implementing “shop-the-look”: a feature commonly seen in the E-commerce business. The idea is to look for the dresses in the stock that visually similar to the user query. The next figure illustrates this idea.

In Jina, we have provided a hello-world example based on Fashion-MNIST dataset. It downloads Fashion-MNIST dataset and indexes 60,000 images via an index flow. The vectorized data is stored into multiple shards. We then randomly sample unseen images as queries, ask Jina to retrieve relevant results. Below is Jina’s retrievals, where the left-most column is query image.
You can reproduce this result via pip install jina && jina hello-world. For Docker users, simply:
1 | docker run -v "$(pwd)/j:/j" jinaai/jina hello-world --workdir /j && open j/hello-world.html # replace "open" with "xdg-open" on Linux |
Index and Search Flows
Let’s take a closer look of how exactly hello-world is implemented. In hello-world, the index and search flows are described via YAML files. Let’s load the YAML file and visualize the flow using .plot():
1 | from pkg_resources import resource_filename |
A side-by-side comparison with YAML config should be straightforward:
| YAML spec | Flow | ||
|---|---|---|---|
|
Roughly speaking, the flow contains two steps (or Pod, as we called in Jina): first it feeds the data to the encoder (with two parallels), the output vector and meta information are then stored in an indexer (with two shards). The query flow runs almost in the same way but with minor changes on the arguments, which are not important for now.
For this tutorial, the most interesting part is using Mindspore for vector representation of images. Specifically, by leveraging the existing hello-world index and query flow, we want to replace whatever defined in ecncode.uses by a Mindspore computer vision model, or a MindsporeEncoder in Jina idioms.
Create Mindspore Executor
Mindspore provides a rich family of deep learning models crossing computer vision and natural language processing. Interested readers can found them at here. For this tutorial, we start with the most classic one: LeNet.
Note that, the aforementioned Mindspore deep learning models are not directly supported by Jina, neither yet available in Jina Hub. Nonetheless, this does not mean one can not use them in Jina. Thanks to the extensibility and plug-and-play architecture of Jina, porting a new deep learning models can be done in just minutes.
The following tutorial requires Jina
v0.7 with Hub extension, please install it via: pip install "jina[hub]"To creat a new executor, type in the directory where you want to work on:
1 | jina hub new |
This will pop up a wizard that helps you walk through the process.
1 | You've downloaded /Users/hanxiao/.cookiecutters/cookiecutter-jina-hub before. Is it okay to delete and re-download it? [yes]: |
You can hit Enter to accept default values for many questions. The most important questions are listed and explained below:
| Question | Answer | Explain |
|---|---|---|
| executor_name | MindsporeLeNet | This name will be used to create a Python Class |
| Select executor_type | 1 - Encoder | This tells Jina Hub to use the encoder boilerplate |
| base_image | mindspore/mindspore:1.0.0 | This generates a Dockerfile that has FROM mindspore... as the first line |
After all answers are completed, you will see a new directory MindsporeLeNet is created under the current working directory. It contains a boilerplate EncodeExecutor with Docker and testing support.
As the final step of the preparation work, let’s download the Mindspore LeNet codebase and Fashion MNIST training data and put it under MindsporeLeNet module in the following way:
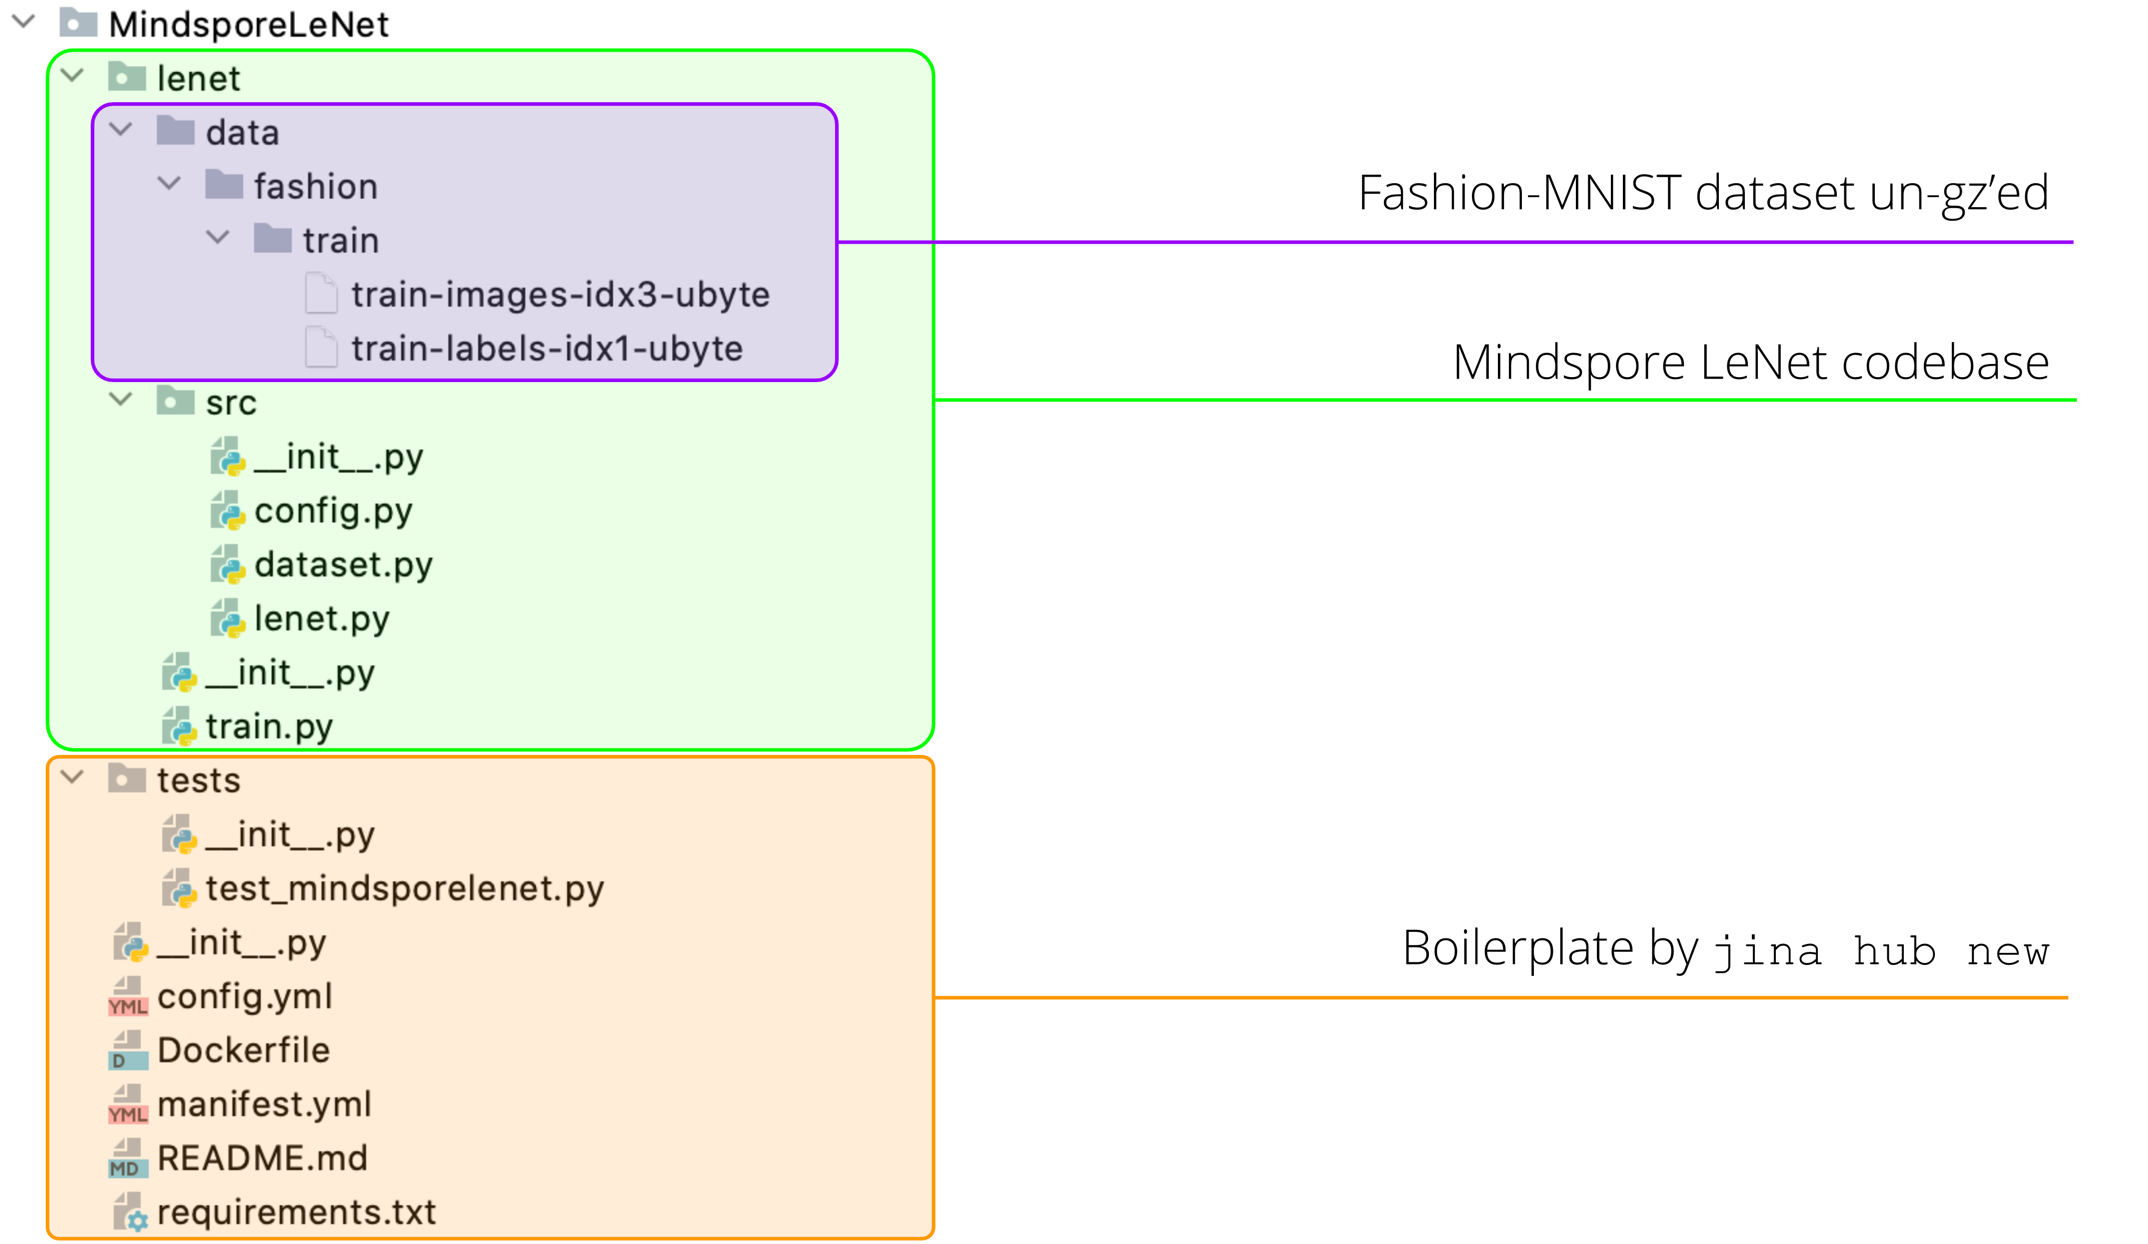
For the sake of clarity, I deleted some unnecessary files from Mindspore LeNet codebase that are irrelevant to this tutorial.
Fill in Mindspore Logics
Now we need to work with __init__.py and fill it with Mindspore LeNet. Right now your __init__.py should look the following:
1 | from jina.executors.encoders import BaseEncoder |
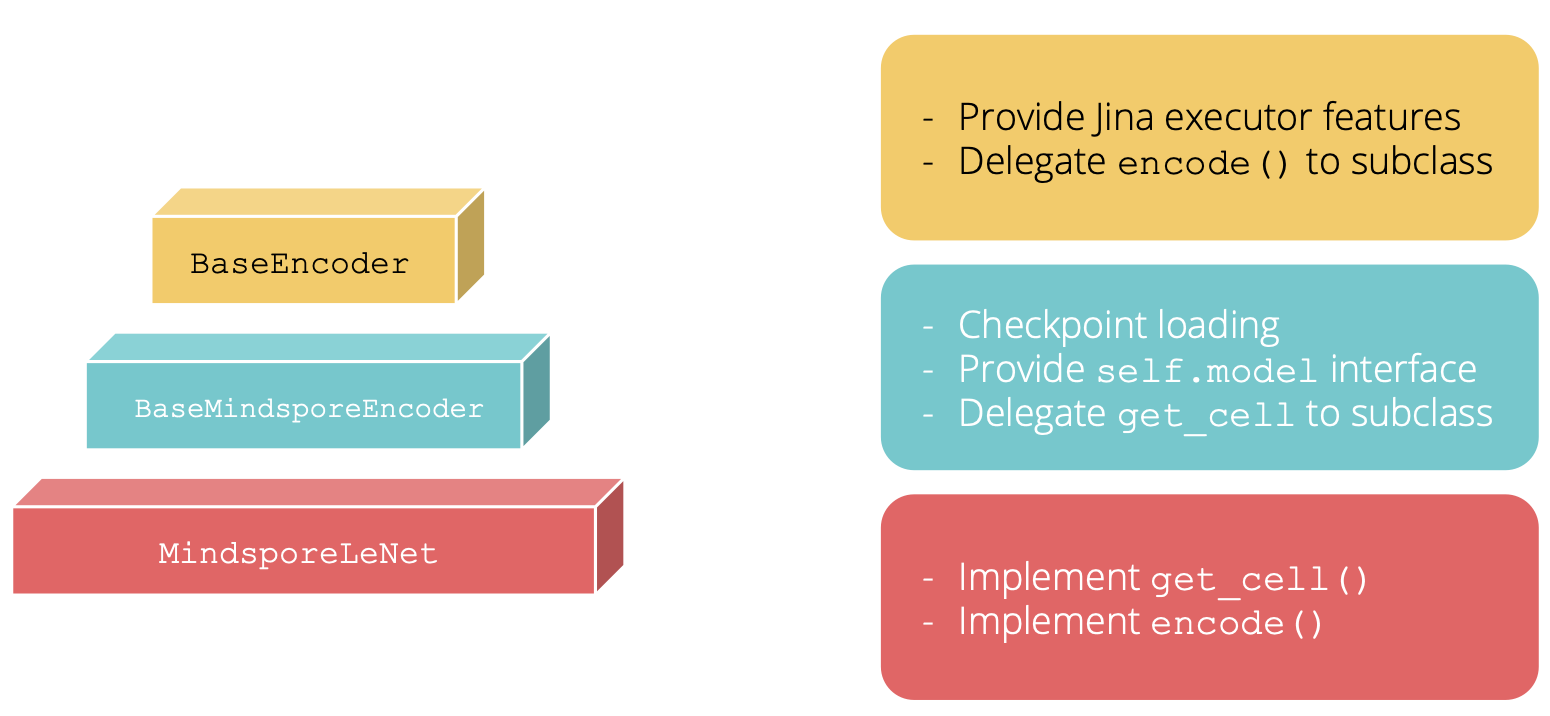
The first step is changing the base class of MindsporeLeNet from BaseEncoder to BaseMindsporeEncoder. The BaseMindsporeEncoder is an abstract class maintained in Jina. It implements the checkpoint loading for Mindspore models in __init__ constructor. Moreover, it provides an property interface to the Mindspore model via self.model. Figure below illustrates the inheritance of our MindsporeLeNet.
With this replacement, we can safely remove the boilerplate __init__ constructor now.
1 | from jina.executors.encoders.frameworks import BaseMindsporeEncoder |
The second step is implementing encode() method. Given a batch size B of image data (represented by a numpy ndarray in shape [B, H, W]), encode() transforms it into vector embeddings (in shape [B, D]). When the Mindspore LeNet model is loaded to self.model, this transform can be simply coded as self.model(Tensor(data)).asnumpy(), where Tensor and asnumpy() is casting between Mindspore tensor object and numpy.ndarray.
The only pitfall here is the shape of the input to self.model. Note that the original LeNet accepts colored images in 32x32. That means the input must be in [B, 3, 32, 32]. However, Fashion-MNIST image data is in 28x28. That means we either have to resize or pad the image. Here we simply pad the image with zeros. The final encode() function should look like the following:
1 | def encode(self, data, *args, **kwargs): |
Finally we need to implement get_cell() method. In Mindspore, “cell” is an idiom for deep neuron network layer. It can be a single neural network layer (e.g. conv2d, relu, batch_norm) or stacked layers. To get the vector embedding, we just need to remove the classification head (i.e. the last softmax layer) from the LeNet. And this can be simply done by inheriting from original LeNet5 class and overriding its construct() function, which defines the computation flow in Mindspore.
1 | def get_cell(self): |
Write a Unit Test
Writing a unit test is not only considered as a good practice but as mandatory when creating new Jina executor. As we will see later, without a unit test the executor can not be built by Jina Hub API.
In the boilerplate there is already a test template generated. You can find a tests folder with test_mindsporelenet.py in it. Let’s work with that. Here I write a simple sanity check to see if Mindspore works, and if it works whether the output shape matches with our expectation.
1 | import numpy as np |
Prepare the Dockerfile
Our work on the Python level is now complete. Let’s move to a higher level: Docker image. Based on the generated Dockerfile, we only need to add one line.
1 | FROM mindspore/mindspore-cpu:1.0.0 |
If you fail to run
pytest and jina inside the Docker, it could be due to a potential ENV PATH bug in mindspore/mindspore-cpu:1.0.0 image. I have submitted a PR to their codebase at here.This line uses train.py in Mindspore LeNet codebase to generate a training checkpoint. We will use this checkpoint later in testing and serving. In config.yml, we specify model_path as the checkpoint file path given by this step. The rest content of this YAML file is auto-generated. requests.on defines how MindsporeLeNet should behave under index and search requests. It’s okay if you don’t understand them for now, they are basically copied from the existing helloworld.encoder.yml.
1 | !MindsporeLeNet |
Let’s Build It!
Finally it’s time to build MindsporeLeNet into a Docker image. Simply type:
1 | jina hub build MindsporeLeNet/ --pull --test-uses |
--pull tells Hub builder to download Mindspore image when it is not in local. --test-uses adds an extra test to check if the built image can dry-run successfully via Jina Flow API.
Now your terminal should start scrolling. If it takes too long, you can change epoch_size in MindsporeLeNet/lenet/src/config.py to a smaller value.
In the end, you should see a successful message as follows:
1 | HubIO@51772[I]:Successfully built cfa38dcfc1f9 |
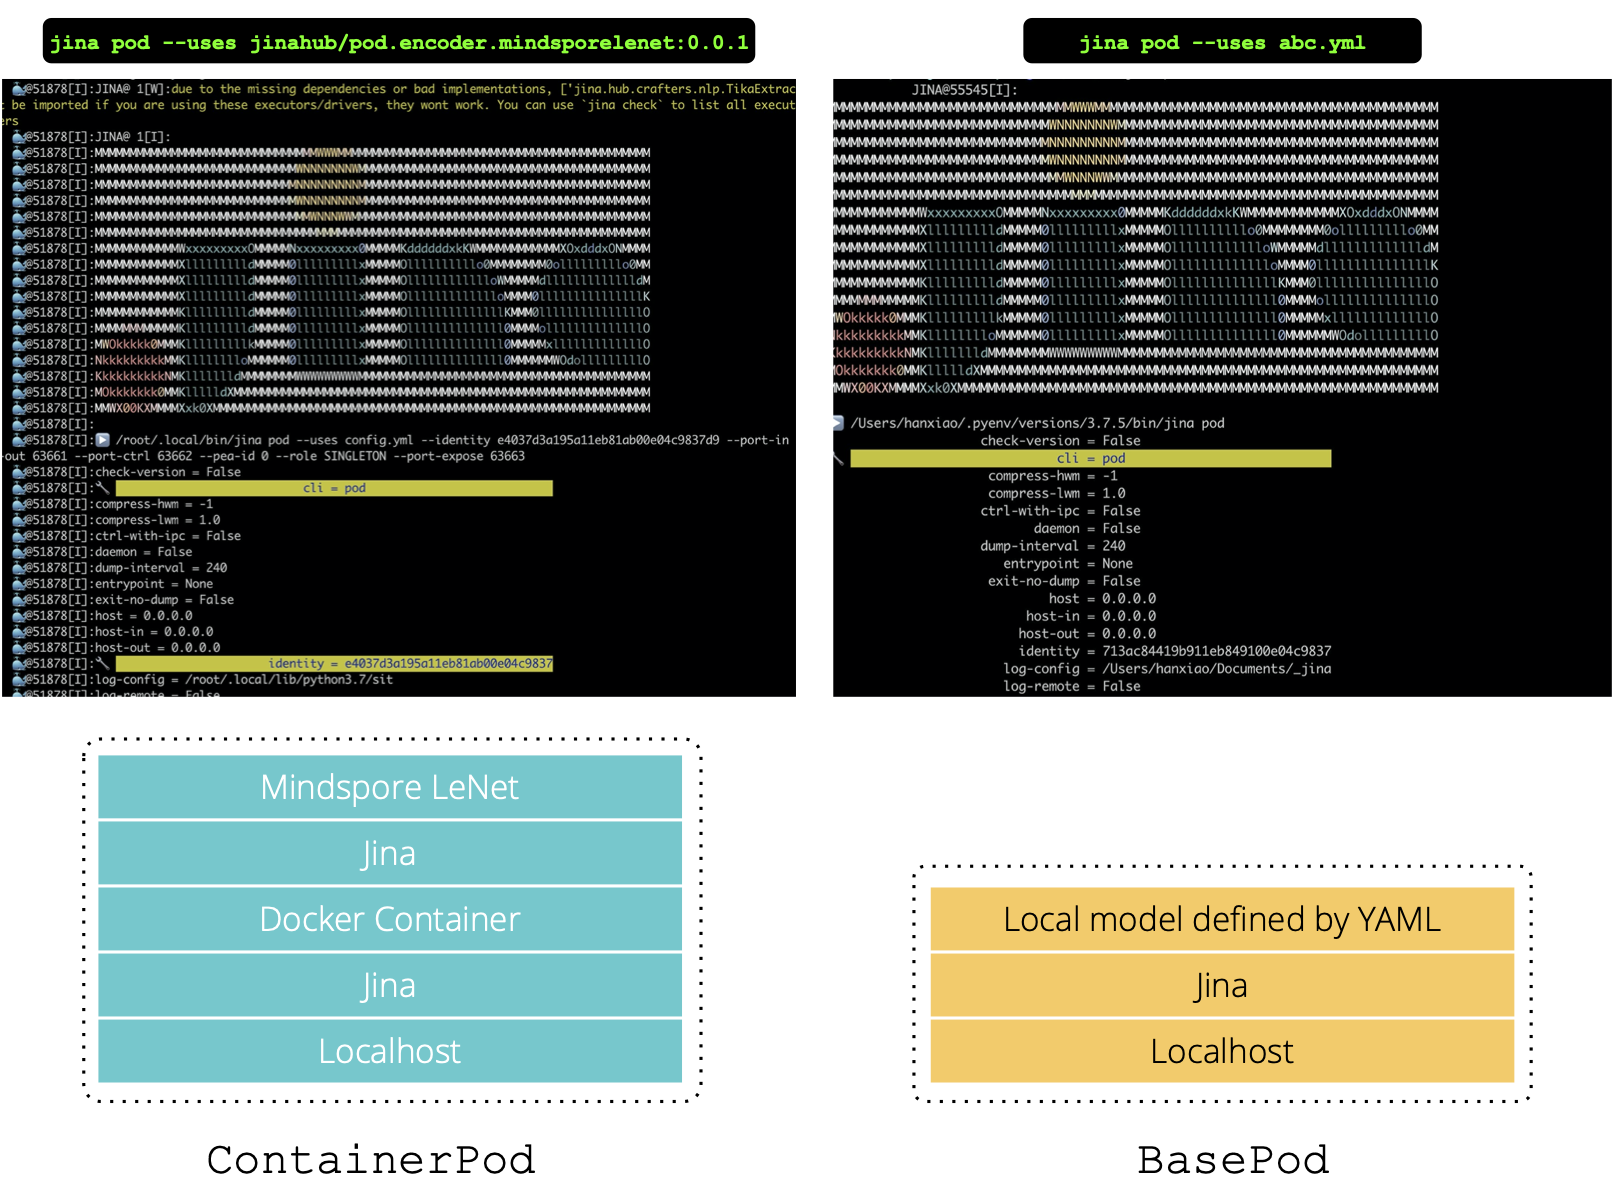
You should now be able to use it as a “Pod” via:
1 | jina pod --uses jinahub/pod.encoder.mindsporelenet:0.0.1 |
Comparing to jina pod --uses abc.yml, we can immediately see that the log given by jinahub/pod.encoder.mindsporelenet:0.0.1 has a 🐳 in front. This indicates logs are piped from the Docker container to the host. The next figure depicts the difference.
You can upload the image to your own Docker Cloud repository via
1 | jina hub build MindsporeLeNet/ --pull --test-uses --repository YOUR_NAMESPACE --push |
Use Mindspore in Index and Search Flow
Finally, let’s use the newly built Mindspore executor in the index and search flow. Simply replace the pods.encode.uses line as follows:
helloworld.flow.index.yml | helloworld.flow.query.yml | ||||
|---|---|---|---|---|---|
|
|
jina hello-world exposes quite some arguments allowing users to play and replace. So simply type:
1 | jina hello-world --uses-index helloworld.flow.index.yml --uses-query helloworld.flow.query.yml |
That’s it, hooray! You should be able to see the query result in a minute.
Summary
In this article, I demonstrated how to use Jina Hub API to create a Mindspore-powered executor. It all starts with jina hub new: thanks to the cookiecutter and well-designed Docker interface, extending Jina with third-party libraries is just a minute thing. Of course, using LeNet for search is just a starting point, there are more powerful deep learning models developed and maintained by Mindspore. Feel free to check out their model zoo, and come back to this tutorial, walk through it again as an exercise.
If you want to know more about the features of Jina, welcome to join our monthly Engineering All Hands in Public via Zoom or Youtube live stream. If you like Jina and want to join us as a full-time AI / Backend / Frontend developer, please submit your CV to our job portal. Let’s build the next neural search ecosystem together!